Real-Time Object Detection Using YOLOv3
Summary
In this project, I conducted an experimental analysis of YOLOv3’s capability for real-time object detection, a critical component in autonomous driving systems. After an extensive review and comparison of leading real-time object detection algorithms, including SSD and previous YOLO versions, YOLOv3 emerged as the superior choice in terms of speed and accuracy. However, challenges remain in detecting small objects and addressing class imbalances, as evidenced by YOLOv3’s performance on the BDD100k dataset.
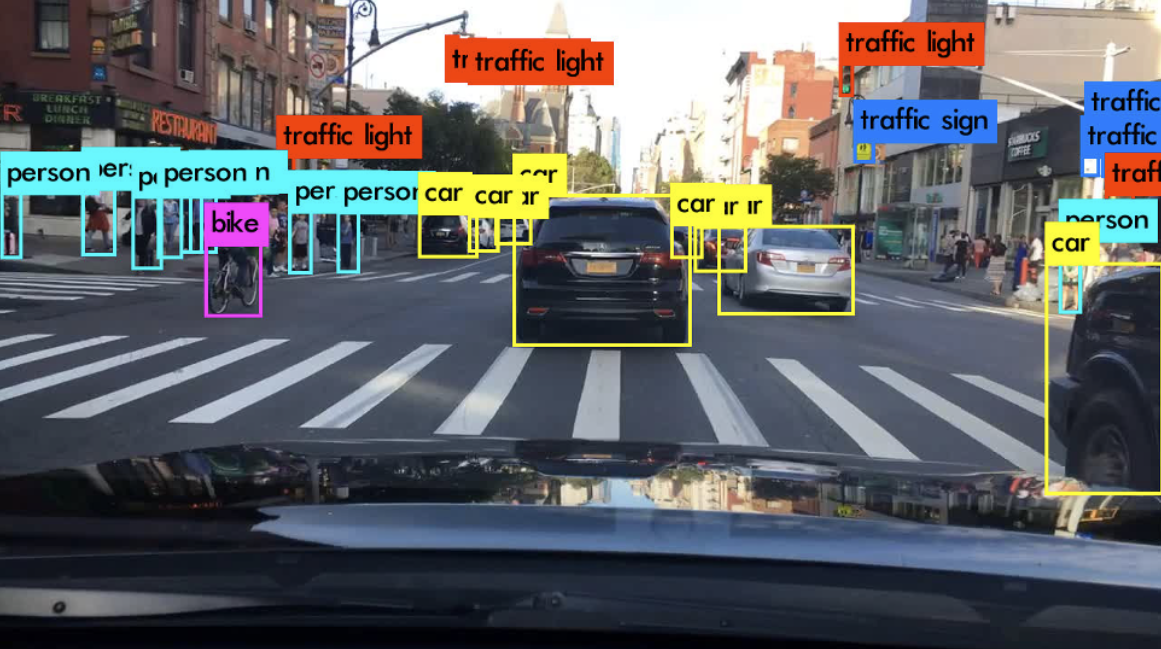
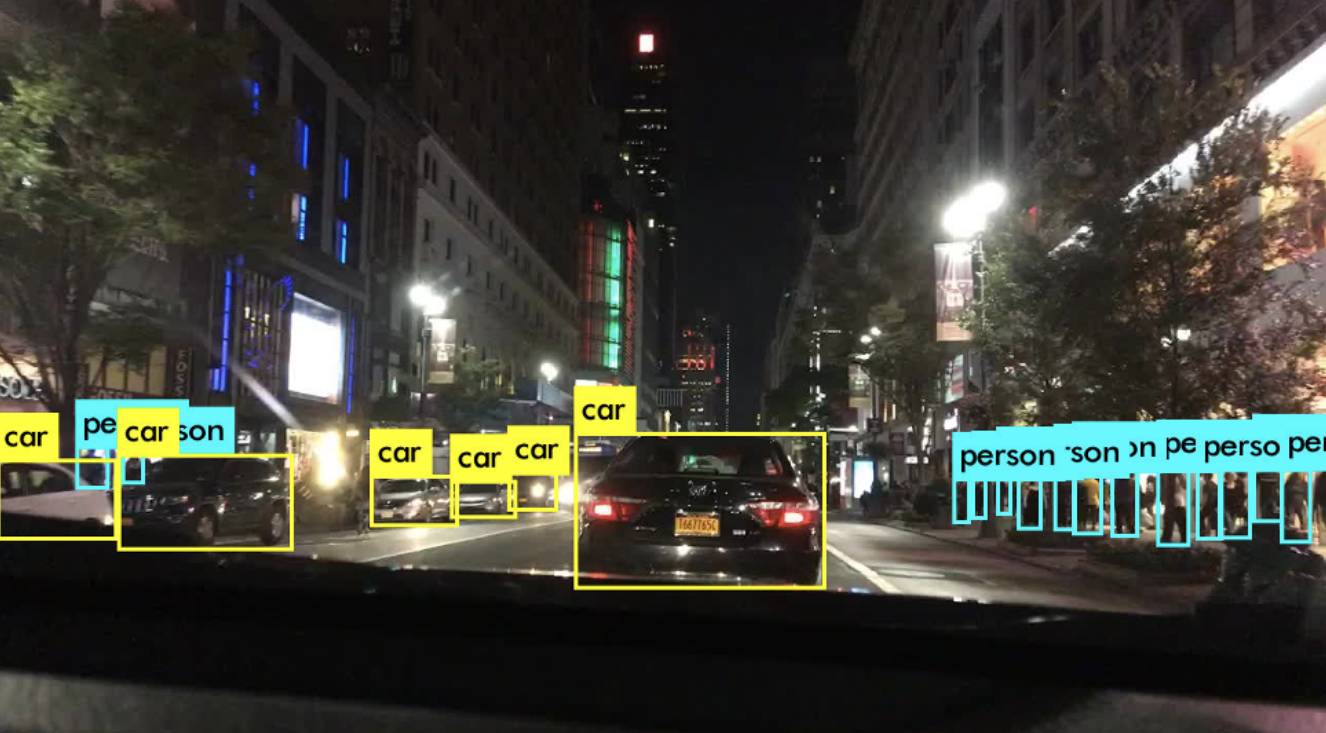
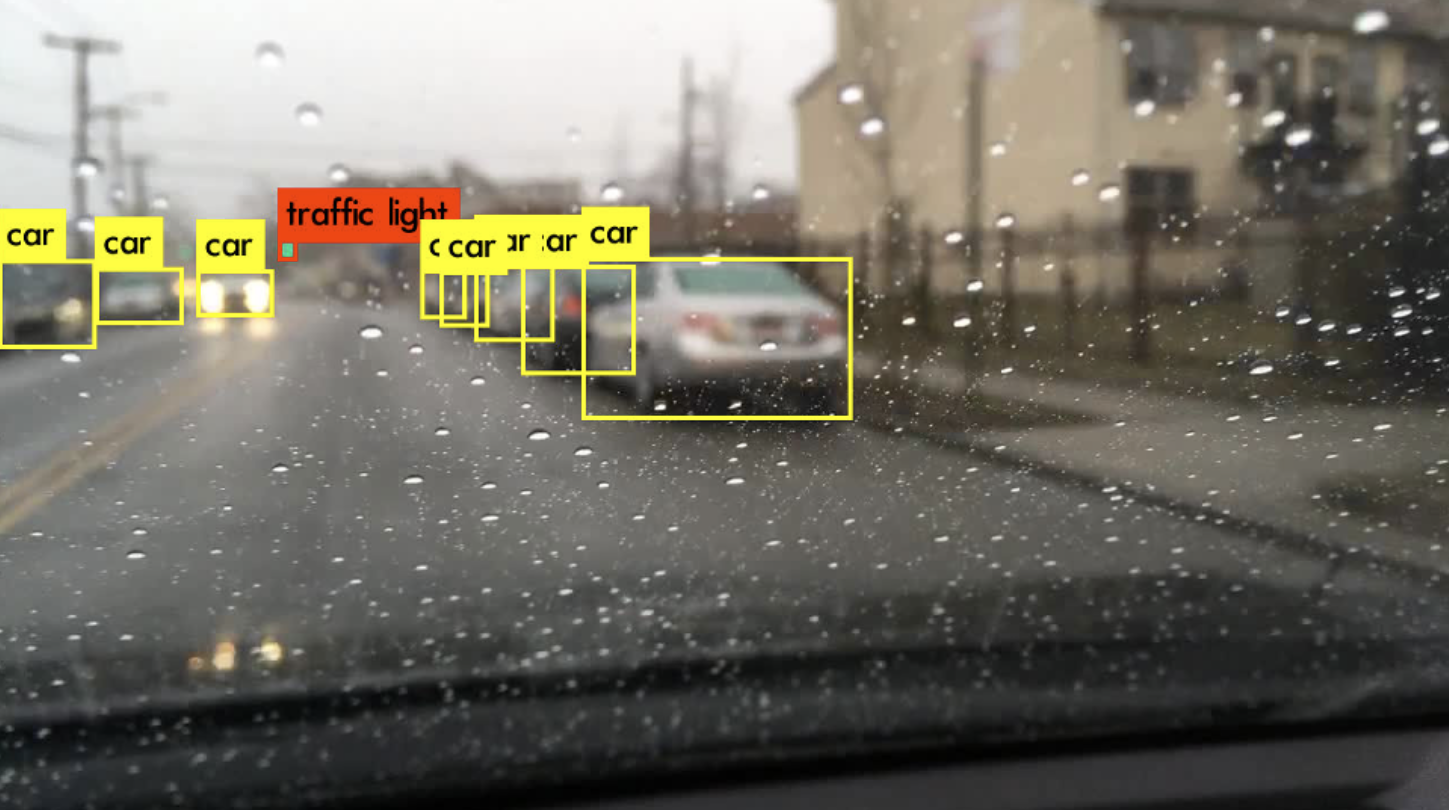
While YOLOv3 showed a promising mAP of 15.44 overall, it particularly excelled with a 32.96 AP in detecting cars, albeit with difficulties in recognizing distant vehicles and those obscured by headlights. Pedestrian detection also proved problematic, especially at farther ranges. To improve upon these issues, data augmentation strategies were proposed, with further suggestions to utilize more balanced datasets like KITTI for training.
Read the Full Paper Read the Literature Review
Post-Project: Putting it on the Edge
After submitting the paper, I decided to explore the model a little bit more and see if I could run it in real-time on cheap and affordable hardware. One way to detect known objects in a video is to stream it to the cloud, where some powerful hardware runs inference (i.e. detect any objects present) and informs the device of the results. While that works amazingly for certain applications, sending data to a server requires stable and secure access to the network and involves a round-trip delay, which gets in the way when working with real-time data.
Considering these limitations, I am inclined to implement object detection directly on the edge. By doing so, it enables faster processing, reduces latency, and alleviates the need for constant internet connectivity. Running the inference locally on the edge devices not only makes the system more efficient for real-time applications but also enhances privacy and security, as sensitive data does not need to be transmitted over the network.
Object Dectection using CNNs
To clarify what I am trying to do, an object detector scans an image to identify all objects present, providing their labels and precise positions within the image. It essentially draws a bounding rectangle around each identified object.

Now, let’s take a brief look at how object detectors work.
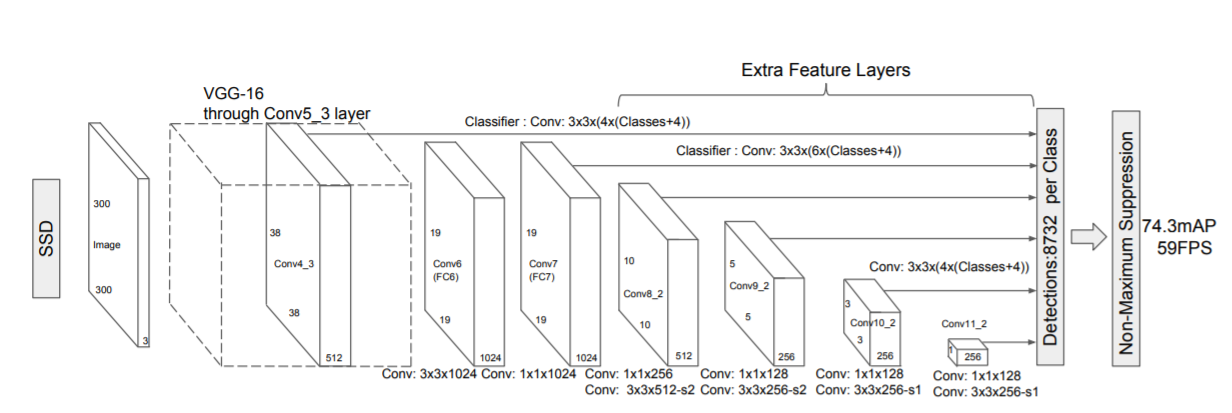
Without delving into the specifics (for which you can refer to my literature review), SSD comprises of two main components:
- First is a backbone network. The backbone network in essentially the feature extractor. In the original SSD paper, Wei Liu built his SSD on top of the VGG16 classifier.
- Second is a head made up of convolutional layers that progressively decrease in size. The reason we want these to decrease in size is to detect objects at different scales. You can imagine how if we were to divide an image into a grid of 19 by 19, we’d be able to detect small objects in the image. And over to the right, on a 1 by 1 grid, we are mostly searching for the larger objects.
The Setup
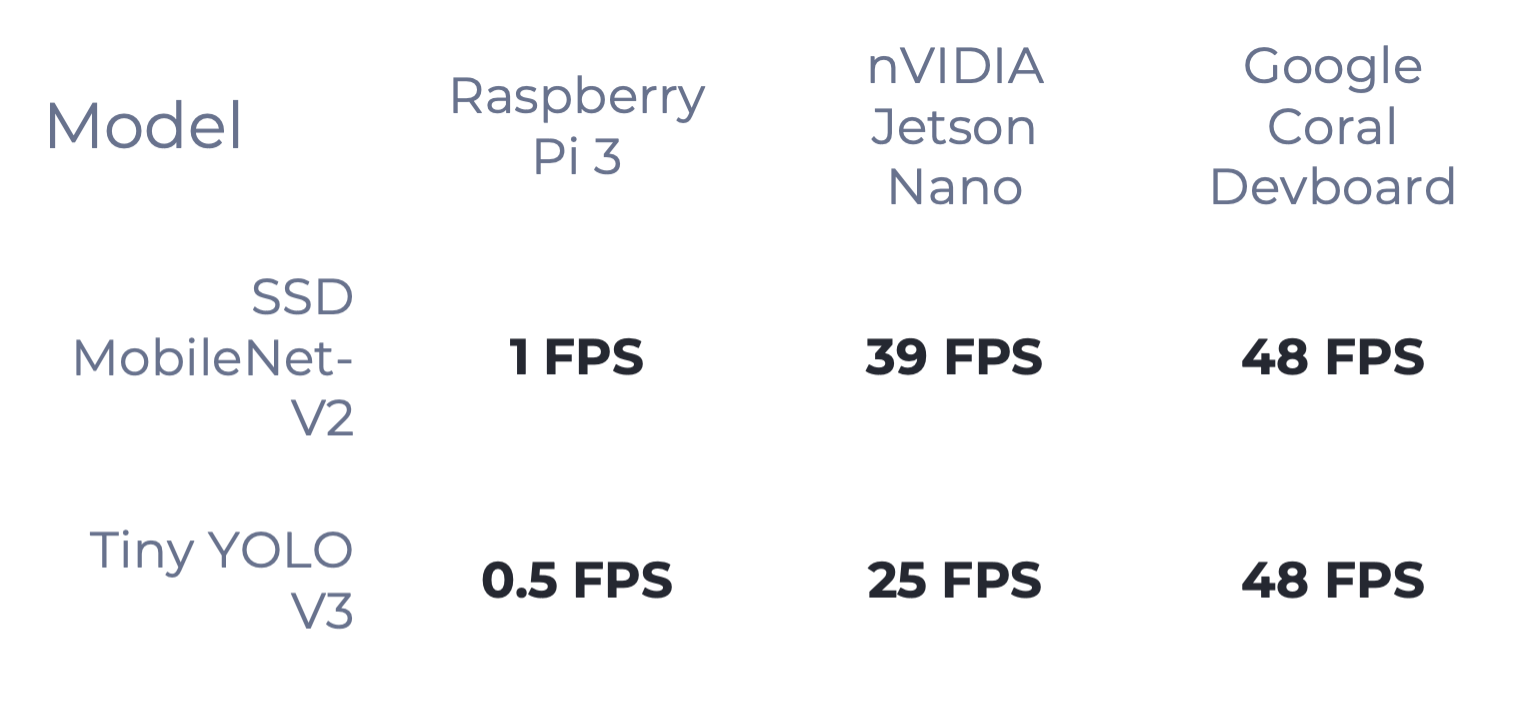
As of the time of writing, the two best algorithms used for object detection on the edge are the SSD and Tiny YOLO. In the table above, we compare the performance of each algorithm on different microprocessors. Keeping in mind that these numbers have been published by the respective companies with very efficient code, the average developer picking up these algorithms may only get about 60% of the frame rate.
After much deliberation, I’ve decided to settle with the newest Raspberry Pi 4, which came out in June this year, as the main board for running object detection algorithms. The Raspberry Pi features a quad core CPU running at 1.5GHZ, 4GB RAM, and only consumes approximately 7.6W in power. It also comes at a very affordable price tag of $75. (19GFLOPS)
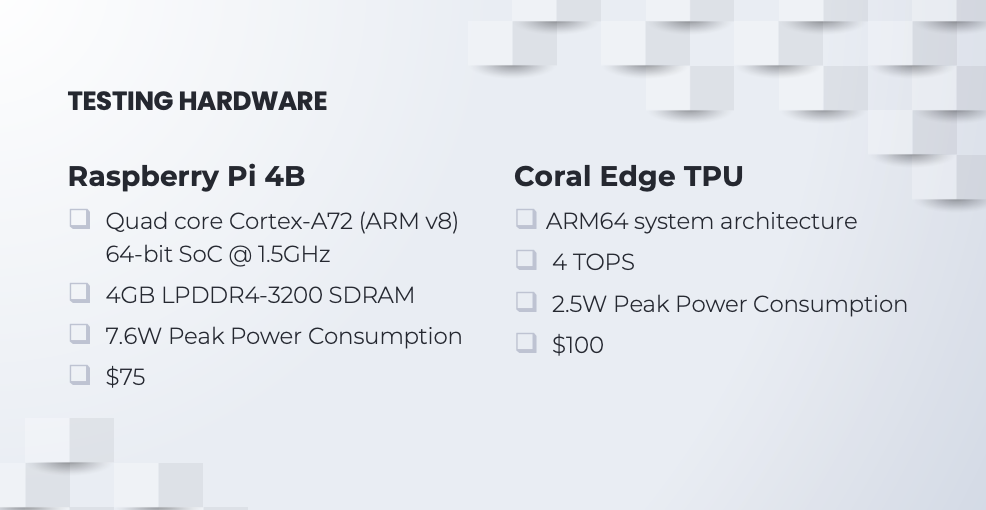
However, the Raspberry Pi alone doesn’t pack the punch necessary for heavy-duty computing, so I’ve thrown in a couple of Coral Edge TPUs. These are basically hardware tailored to chew through tensors and matrix multiplications like nobody’s business. Architecture-wise, they’re a match made in heaven with the Raspberry Pi, sipping just about 500mA of power, and they won’t break the bank either, setting you back just $100.
Alright, to get this show on the road, we will need eyes in the field — enter the Raspberry Pi camera. Picked it for a no-brainer reason: it’s literally made for the Raspberry Pi. Plus, this camera is purported to capture the action at 90FPS at 640x480 resolution.

- Two Coral Edge TPUs are connected to the Raspberry Pi 4 via USB 3.0.
- Raspberry Pi Camera is connected to the Raspberry Pi 4 via the Camera Serial Interface.
- The whole setup will be powered by a 5V Car Cigarette Lighter Adapter.
What was left to do was to create a virtual environment and install Python3, TensorFlow, and OpenCV to run my model on the Raspberry Pi.
Results
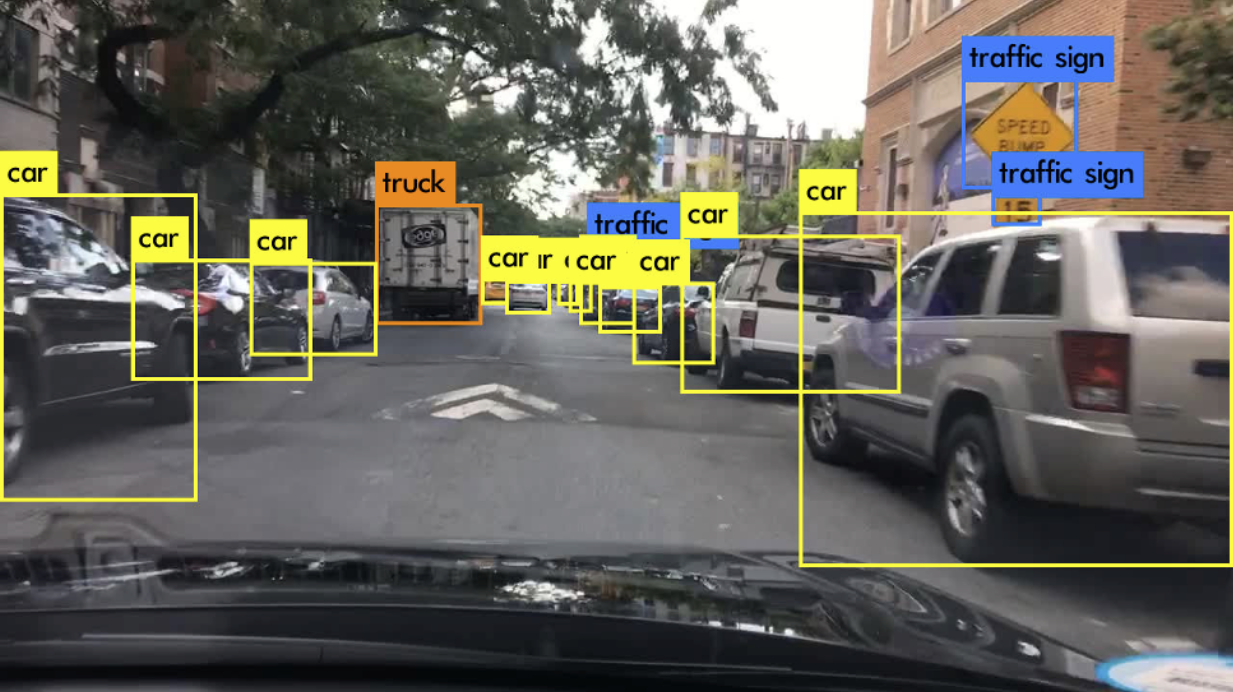
In the end, my Cigarette Lighter Adapter was defective and couldn’t delivery nearly enough power to the entire setup so I unplugged one of the Coral Edge TPUs. Despite that, the setup still choked on power and couldn’t function optimally but I didn’t know until after I watched the screen recording.
As I drove around downtown Montreal, I remotely accessed the Raspberry Pi from my MacBook using RealVNC, which was the only way I could control the Raspbery Pi. To capture the whole video, I recorded my MacBook’s screen, which is why the final video looks choppy — RealVNC dropped too many frames.
Read the Full Paper Read the Literature Review